This is a Guest post by Ahmed Hussein, If you want to contribute feel free to contact me.
Today we have a very cool and step-by-step tutorial on how to make a CSS3 drop shadow changer using Ajax and little bit of PHP/MySQL. You may ask yourself why I’m using PHP/MySQL in a CSS3 tutorial? and the answer is simple, to save the settings and fetch again.
Demo
The Animation will only be viewable on Google Chrome and Safari 4+ because its based on WebKit.
What’s WebKit?
WebKit is an impressive open source web browser engine. WebKit is also the name of the Mac OS X system framework version of the engine that’s used by Safari, Dashboard, Mail, and many other OS X applications. WebKit’s HTML and JavaScript code began as a branch of the KHML and KJS libraries from KDE. And it is currently supported by Google Chrome and Safari4+.
Here’s an image about what we will have at the end of this tutorial:

Now let’s begin by building the main layout:
The Body Styling
body{

margin:0;

padding:0;

}
We did nothing except, set the padding as zero as well as the margin.
The Success Message Styling
#success{

background: #c8ffb4;

width:500px;

height:50px;

border-radius: 5px;

-moz-border-radius: 5px;

-webkit-border-radius: 5px;

font-weight:bold;

padding-left:50px;

font-family:Arial, Helvetica, sans-serif;

color:#333;

padding-top:25px;

text-align:left;

}
What we did up there is first, change the background to light green then, the width and the height next, the border radius and this is only available in CSS3, and basically what it does, that it’s making rounded corners, so if you’re going to increase the value of the radius, you will get more rounded corners. after that, nothing too fancy just basic stuff like font and padding.
The Saving Button
#save{

background: url(../images/save.png) no-repeat;

height:60px;

width: 171px;

border:none;

cursor:pointer;

cursor:hand;

outline:none;

}
First, We set the background, height, width and border Then, we set the cursor to pointer to let the mouse change when it’s over the button, next set the cursor again to hand to change the mouse to hand icon. After that, change the outline to none, because a lot of browsers shows outlines on buttons.
The HTML5 Work
<!DOCTYPE html>

<html>

<head>

<meta http-equiv="Content-Type" content="text/html; charset=utf-8" />

<title>Drop Shadow Changer</title>

<link rel="stylesheet" href="css/main.css">

<script src="js/jquery.js" type="text/javascript"></script>

<script src="js/main.js" type="text/javascript"></script>

</head>

<body>

<br><br><br>

<center>

<div id="success"></div><br><br>

<div id="image"></div><br><br>

<table>

<tr>

<td>Posission: </td>

<td><input type="Range" name="slider" id="slide" /></td>

<td><div id="nums"> </div></td>

</tr>

<tr>

<td>Blur: </td>

<td><input type="Range" name="blure" id="blure" /></td>

<td><div id="blures"> </div></td>

</tr>

</table>

<br>

<div id="load">

<table>

<tr>

<td><img src="images/load.gif"></td>

<td>Saving...</td>

</tr>

</table>

</div>

<br><input type="button" id="save" name="save">

</center>

</body>

</html>
Here’s the funny part, First i start the HTML page as HTML5 page by adding the !DOCTYPE html tag, then inside the head you will see two scripts tags, one of them is for including the jQuery and the other one is for including the main JavaScirpt file that we will made. And I included the style file we’ve made earlier.
Now take a look inside the body tag, Fist thing you will see is the success message div and we will hide this using jQuery, Next take a break line and you will see the image div that we will do all the work on just give it image as id to apply the style also we will need the id in the jQuery work. after that, take a break line and you will see a normal table but look closer you will find the magic.
First, we will ad a little td with one word inside Position underneath it you going to find normal html input but the type is different this time and it called Range and that gives you a slider controller with numeric value from -0 to 100 as default. So we will give this range input an id as slide because we will need this id in the JavaScript work. Now make another td and put a little div inside it and give it “nums” as id actually i don’t know why i called it like that but it’s okay, and inside this div we will but the numeric value of the position range input, then close the first TR.
Next, start another TR and make couple of TDs and inside the first one you going to see Blur because the CSS3 drop shadow is very customizable so you can adjust the position, blur and even the color. After that, make another td and inside it we will make another “Range/Slider” input and give it blure as id and i know it’s blur not “blure” :P. Then, do the same as the last time by making a little div and give it an id of blures. Close the TR and The whole table and let’s do something new.
Now make a little div and give it load as id inside this div we will add loading image that i created at http://www.ajaxload.info , and “saving” word. and we will hide this div using jQuery and will show it when we press save.
Now just add normal button input but give it save as id to apply the style and we will need this in the JavaScript, too.
Now after doing all of this you’re done with the main layout. Now Let’s do the JavaScript work
The JavaScript Work
//----------------------------------------+

//Code by Ahmed Hussein For CssReflex.com |

//Follow on Tiwtter @Valodes |

//Check Blog @ http://www.zingyso.com/b |

//----------------------------------------+

$(document).ready(function(){

var pos = $("#slide").val();

var blu = $("#blure").val();

$('#load').hide();

$("div#nums").html(pos);

$("div#blures").html(blu);

$("#success").hide();

$("#image").css({'-webkit-box-shadow': pos+"px "+pos+"px "+blu+"px "+"#666"});

$("#slide").change(function(){

var num = $("#slide").val();

var blu = $("#blure").val();

$("div#nums").html(num);

$("#image").css({'-webkit-box-shadow': num+"px "+num+"px "+blu+"px "+"#666"});

});

$("#blure").change(function(){

var num = $("#slide").val();

var blu = $("#blure").val();

$("div#blures").html(blu);

$("#image").css({'-webkit-box-shadow': num+"px "+num+"px "+blu+"px "+"#666"});

});

$('#save').click(function(){

var num = $("#slide").val();

var blu = $("#blure").val();

$.ajax({

url: "action.php",

type: "POST",

data: {pos: $("#slide").val(), blu: blu = $("#blure").val()},

success: function(data){

$("#success").html(data);

$("#success").slideDown(400).delay(2000).slideUp(400);

}

});

});

$("#load").ajaxStart(function(){

$(this).show();

});

$("#load").ajaxSuccess(function(){

$(this).hide();

});

});
Let me explain what we are doing here, first of all this is jQuery not pure JavaScirpt. Now to start jQuery code you may do this inside “script” or inside normal .js page and this’s what i’m doing here.
At the start of any jQuery code you have to put the following code:
$(document).ready(function(){//Your code here });
replace “//your code here” with your own code, now:
var pos = $("#slide").val();

var blu = $("#blure").val();
Here we made two variables the first one “pos” = to the slide value, “#slide” is like document.getElementById but we replace all of this with just a little hash tag “#”. the second variable blu = to the blure val. just to know “.val()” is returning the value of an element.
$("div#nums").html(pos);

$("div#blures").html(blu);
Now the first line here we changing what’s inside the div nums to html contents using the .html() function which is showing html elements normal without changing them to text. But you can show the contents as text by using .text() function.
$("#success").hide();
Now we just hid the success message using .hide() function.
$("#image").css({'-webkit-box-shadow': pos+"px "+pos+"px "+blu+"px "+"#666"});
Now i’m applying a css3 styling using .css function, and here’s how it works:
.css({“attributes”:”value”, “attributes2″:”value”, …}); so it’s just normal css but inside jQuery. But what i’m actually doing is i’m applying CSS3 drop shadow to the image using the default pos and blu values and they’re 50, so to do that i’m using the variables inside the function and i can do that just like that:
The normal css will be ‘-webkit-box-shadow’:’50px’, but we want to use the variables’ values so we will do it by adding plus signs between the words to separate them, i mean to make this work you have to write it like that:
css({'-webkit-box-shadow': variable+"normal text"+variable+"normal text"+variable+"normal text"})
So we put the normal text inside quote and separate between the different words and variables by plus sign.
The following code will be executed once you move the position slider:
$("#slide").change(function(){

var num = $("#slide").val();

var blu = $("#blure").val();

$("div#nums").html(num);

$("#image").css({'-webkit-box-shadow': num+"px "+num+"px "+blu+"px "+"#666"});

});
Now by using .change() we saying if the value of this element changed do the following, so if the value of slide changed the code inside .change() will be executed.
inside the .change() we redefining the variables again, then, changeing the nums div content to make it change when you move the slider.
After that we apply css3 drop shadow to the image with the new positioning,
num+"px "+num+"px "+blu+"px "+"#666"
the first num+”px” and the second one just repositioning the shadow and the blu+”px ” is still the same and it points to the blur value and finally the #666 is the shadow color.
The following code will be executed once you move the blur slider:
$("#blure").change(function(){

var num = $("#slide").val();

var blu = $("#blure").val();

$("div#blures").html(blu);

$("#image").css({'-webkit-box-shadow': num+"px "+num+"px "+blu+"px "+"#666"});

});
As you can see i’m doing the same thing but this time with the blure slider and the blures div.
The following code will be executed once you hit the save button:
$('#save').click(function(){

var num = $("#slide").val();

var blu = $("#blure").val();

$.ajax({

url: "action.php",

type: "POST",

data: {pos: $("#slide").val(), blu: blu = $("#blure").val()},

success: function(data){

$("#success").html(data);

$("#success").slideDown(400).delay(2000).slideUp(400);

}

});

});
First, the .click() function is very simple it says, if you click on the element the following code will be executed.
Inside the .click() we redefining the variables again, then, starting ajax request using $.ajax({}) so let me explain this:
using $.ajax() you will be able to send HTTP request without reloading the page, you can send both POST or GET requests to any type is files PHP, ASP, etc…
And it work just like this:
url: “your action file”,
type: “post or get”,
data: {name: variable or "text value", name2: variable or "text value", name3: variable or "text value"},
success: could be function or alert or whatever you want, this will be shown in case the request is succeeded.
function(data){

$("#success").html(data);

$("#success").slideDown(400).delay(2000).slideUp(400);}
This function shows the success message by slideDown then delay 2 seconds after that slideUp.
$("#load").ajaxStart(function(){

$(this).show();

});

$("#load").ajaxSuccess(function(){

$(this).hide();

});
Now we will show the load div once we send the request then hide it again once the request is done, using the $.ajaxStart() we will say when the request is sent show $(this) while $(this) stand for $(“load”). and using the $.ajaxSuccess() we will say when the request is send success message hide $(this) while $(this) stand for $(“load”).
And that’s it this is everything JavaScript
The PHP Work
The full code:
<?

//----------------------------------------

//Code by Ahmed Hussein For CssReflex.com |

//Follow on Tiwtter @Valodes |

//Check Blog @ http://www.zingyso.com/b |

//----------------------------------------

//Database connect

$connect = mysql_connect("localhost", "root", "") or die(mysql_error()); //Connection user and pass

$select = mysql_select_db("shadow", $connect); //Selecting the Database

//Set Variables

$pos = $_POST['pos']; //Position Value

$blu = $_POST['blu']; //Blur Value

//Insert data into database

$Query = "INSERT INTO shad_set (position,blur) VALUES('".$pos."', '".$blu."')"; //The SQL Query

$Insert= mysql_query($Query) or die(mysql_error()); //Insert to database

echo "The new settings are saved!";

?>
Explanation
First anything starts with "//" is a comment , and anything starts with "$" is a variable.
//Database connect

$connect = mysql_connect("localhost", "root", "") or die(mysql_error());

//Connection user and pass

$select = mysql_select_db("shadow", $connect);

//Selecting the Database
mysql_connect is the database connection function and it's separated to 3 parts and sometimes 4, ("Your Host -- Usually localhost", "Database UserName", "Database Password", "Database Port")
mysql_select_db is the the database selector function and it's separated to 2 parts, ("Database Name", "Database Connection Link And this is the connecting variable")
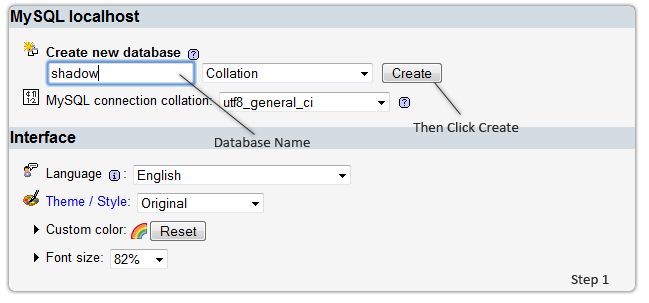
Now before i continue explaining the rest of the code let me show you how to make MySQL Database.
The MySQL Database
Go to your phpmyadmin and do the follow the instructions below:
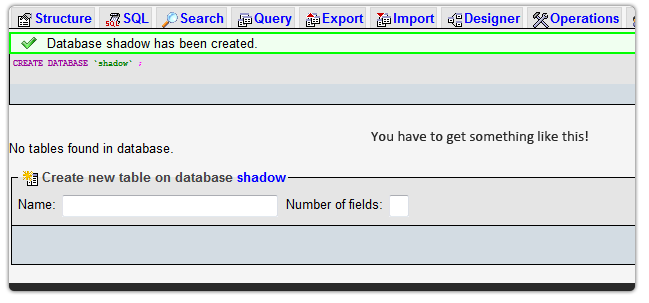
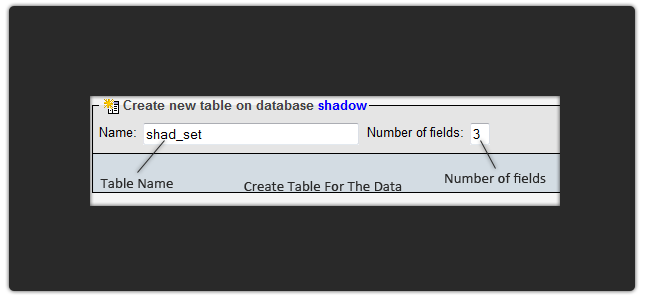
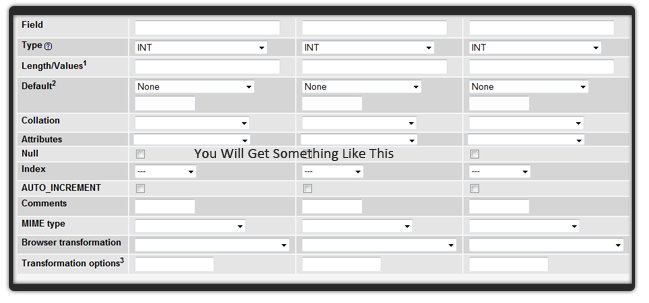
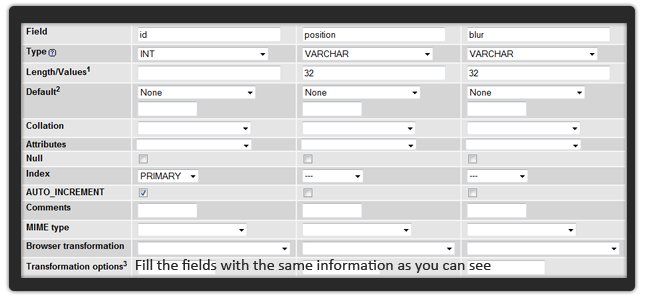
Click save and you done, but let me explain, something the AUTO_INCREMENT for the id is to let it increase by itself without having to insert a value for it everytime.
Let's continue:
$pos = $_POST['pos']; //Position Value

$blu = $_POST['blu']; //Blur Value inside
Here you can see two variables first one $pos = to the post pos from the ajax request and the other one is $blu = to the post blu from the ajax request.
$Query = "INSERT INTO shad_set (position,blur) VALUES('".$pos."', '".$blu."')";

//The SQL Query

$Insert= mysql_query($Query) or die(mysql_error());

//Insert to database

echo "The new settings are saved!";

Here you can see two variables, too. the first one $Query = to the SQL query and inside it we saying " insert the following data inside shade_set table into fields position and blur and the actual values are the variables $pos for position and $blu for blur"
Then using mysql_query() function we execute the $Query... Next after all of this print or echo message and this is the success message "The new settings are saved!"...
but to fetch the saved settings from the database you can do it this way:
<?

//----------------------------------------

//Code by Ahmed Hussein For CssReflex.com |

//Follow on Tiwtter @Valodes |

//Check Blog @ http://www.zingyso.com/b |

//----------------------------------------

//Database connect

$connect = mysql_connect("localhost", "root", "") or die(mysql_error()); //Connection user and pass

$select = mysql_select_db("shadow", $connect); //Selecting the Database

//Insert data into database

$Query = "SELECT * FROM shad_set WHERE id = '1'"; //The SQL Query

$Insert= mysql_query($Query) or die(mysql_error()); //Insert to database

$res = mysql_fetch_array($insert);

$Pos = $res['pos'];

$Blu = $res['blu'];

mysql_close($connect);

?>
It's the same thing about database connect, but the query is changed now and we are saying select all data from shad_set where the id field = 1 or whatever id you want to fetch.
Then $res = mysql_fetch_array($insert) which transform data from database to array.
$res['pos'] = the pos from the database and same for $res['blu'];
Now we've done everything... So now you have the drop down shadow changer with php/mysql saving option . Hope you enjoyed the tutorial. If you you have any questions, feel free to ask by commenting below.