
This web design tutorial will be split into two parts. Part one with show you how to create the graphical elements in Photoshop and in part two I will show you how to create the sprites and code the navigation using HTML and CSS.
1. Kick things off by opening up a new RBG Photoshop document. I’m using 900px by 275px.
2. Create a round-edged box 800px by 43px with a 6px corner radius.

3. Hit the blending options and add a linear gradient to the box.
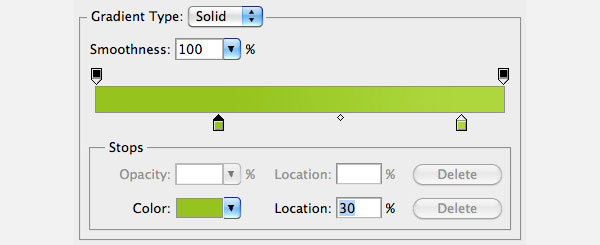
Drag the left blender to 30% and give it a colour of #96c31d and the right to 90%with a colour of #add73e.
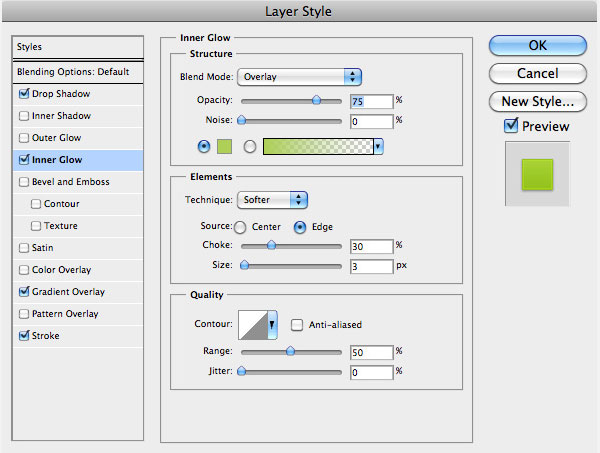
Whilst you’re in the Blending Options, add the following:
• Add an Inner Glow #aecf57 as below:
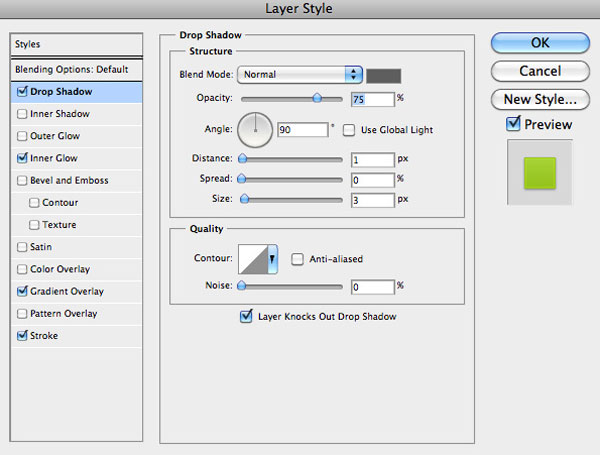
Add a Drop Shadow #5e5e5e, settings as below:
Add a 1px Inner Stroke #96c31d
Now you should have something that looks similar (if not identical) to this:

Now we’re going to add some more gloss
4. Select the layer and duplicate it. Turn off the Blending Options and give the layer a fill of #fff.
5. Drop the layer styles and give the layer a colour #ffffff. Then right-click the layer and Rasterize it.
6. Select the bottom half the rasterized layer using the Marquee tool and delete it. Then select the remaining half of the shape using the quick select tool.

7. Click the Quick Mask button and select the gradient tool (black to white gradient). Then select the masked area again using the Magic Wand
![]()
8. Select the Gradient tool and set the gradient from black to white.
9. Drag the gradient down vertically over the selected area

10. Click the Quick Mask button again and hit the Delete key. Drop the layer Opacity to 30%.
Now we have a nice, glossy navigation bar.

It’s time to add some links
For this example, I’ve used the font type Bebas Neue, which you can download here.
11. Type out your links. I’ve used font size 18px, Crisp. You can use alt and the directional arrows on your keyboard to increase or decrease the spacing between two letters (should you wish to).
12. Create a new layer below your text layer and draw out a 4px round-edged box with the fill colour #789e12.
13. Add the following Layer styles to this shape:
Drop shadow #5e7e1d
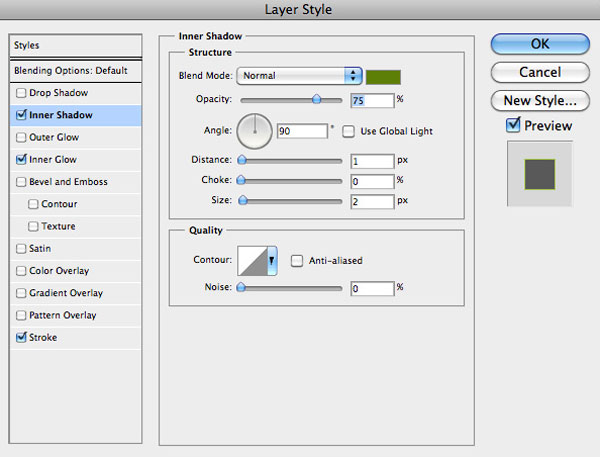
Inner Glow #8eb81f
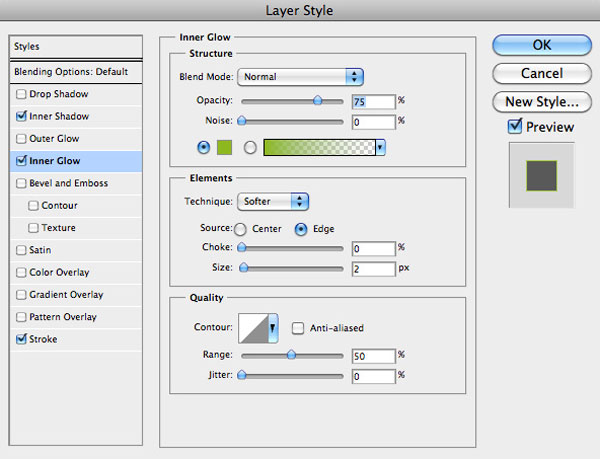
Any finally a 1px Inner Stroke #aac956
This is the “hove” & “active” state of the link. For the default link state, we will again create 4px round-edged rectangles with a base colour of # 8cb71c and a 1px Inner Stroke # b5d267.
Next, give the colour #d5ee91 to the inactive links. Pop a drop shadow on there too. I went for 1px drop shadow #83b00b at -132. Play around with it, see what you think looks best.
The last thing to do is add the curved sheen to the active/ hover state of the button. To do this, I duplicated the layer, turned off the Layer styles and set a fill colour to #ffffff. Then I dropped the opacity of the layer to 15% and Rasterized it. Finally, using the Elliptical Marquee Tool, I dragged out an oval shape and deleted the selection.
The finished article…

So that’s it for the first of this two-part tutorial on how to create slick, glossy navigation. Not too time consuming or difficult but quite a nice, professional-looking result.
Be sure to check out part 2 coming very soon, which will go through how to slice your navigation up, create your sprites and code her up using HTML and CSS3 to create a stunning navigation for your web design.
Part 2